How to Customize Azure AD JWT Claim Token with Custom Attributes

Summary
The JWT Token returned by Azure AD, on successful user authentication when signing into an Application, contains a default set of attributes. At times it is desirable to have certain additional returned in the JWT Token itself rather than have the Application make a separate Graph API call only to retrieve them. In this post, I have shown how 2 attributes, e.g. the EmployeeID and the Country of residence of the User signing in, can be added to the JWT Token.
Both ‘EmployeeID’ and ‘Country’ are standard attributes already available in the User Claim Set - see [this]. These need to be included in the JWT Token that Azure AD issues on User authentication.
Note that at this time this Azure AD feature is in preview
Set values for the additional User attributes in Azure AD
Before they can be used, the ‘EmployeeID’ and ‘Country’ User attributes in Azure AD need to be populated with values. Note: In the Azure AD Tenant I used, the ‘Country’ attribute values were already set for all the Employees. The ‘EmployeeID’ attribute values however were not.
I have used the Microsoft [GraphExplorer] to set these values (See Figure 1). Ensure the values of these attributes are returned in the response. Before this can be applied Enterprise-wide, setting of the values needs to be done for all the Employees in Azure AD.
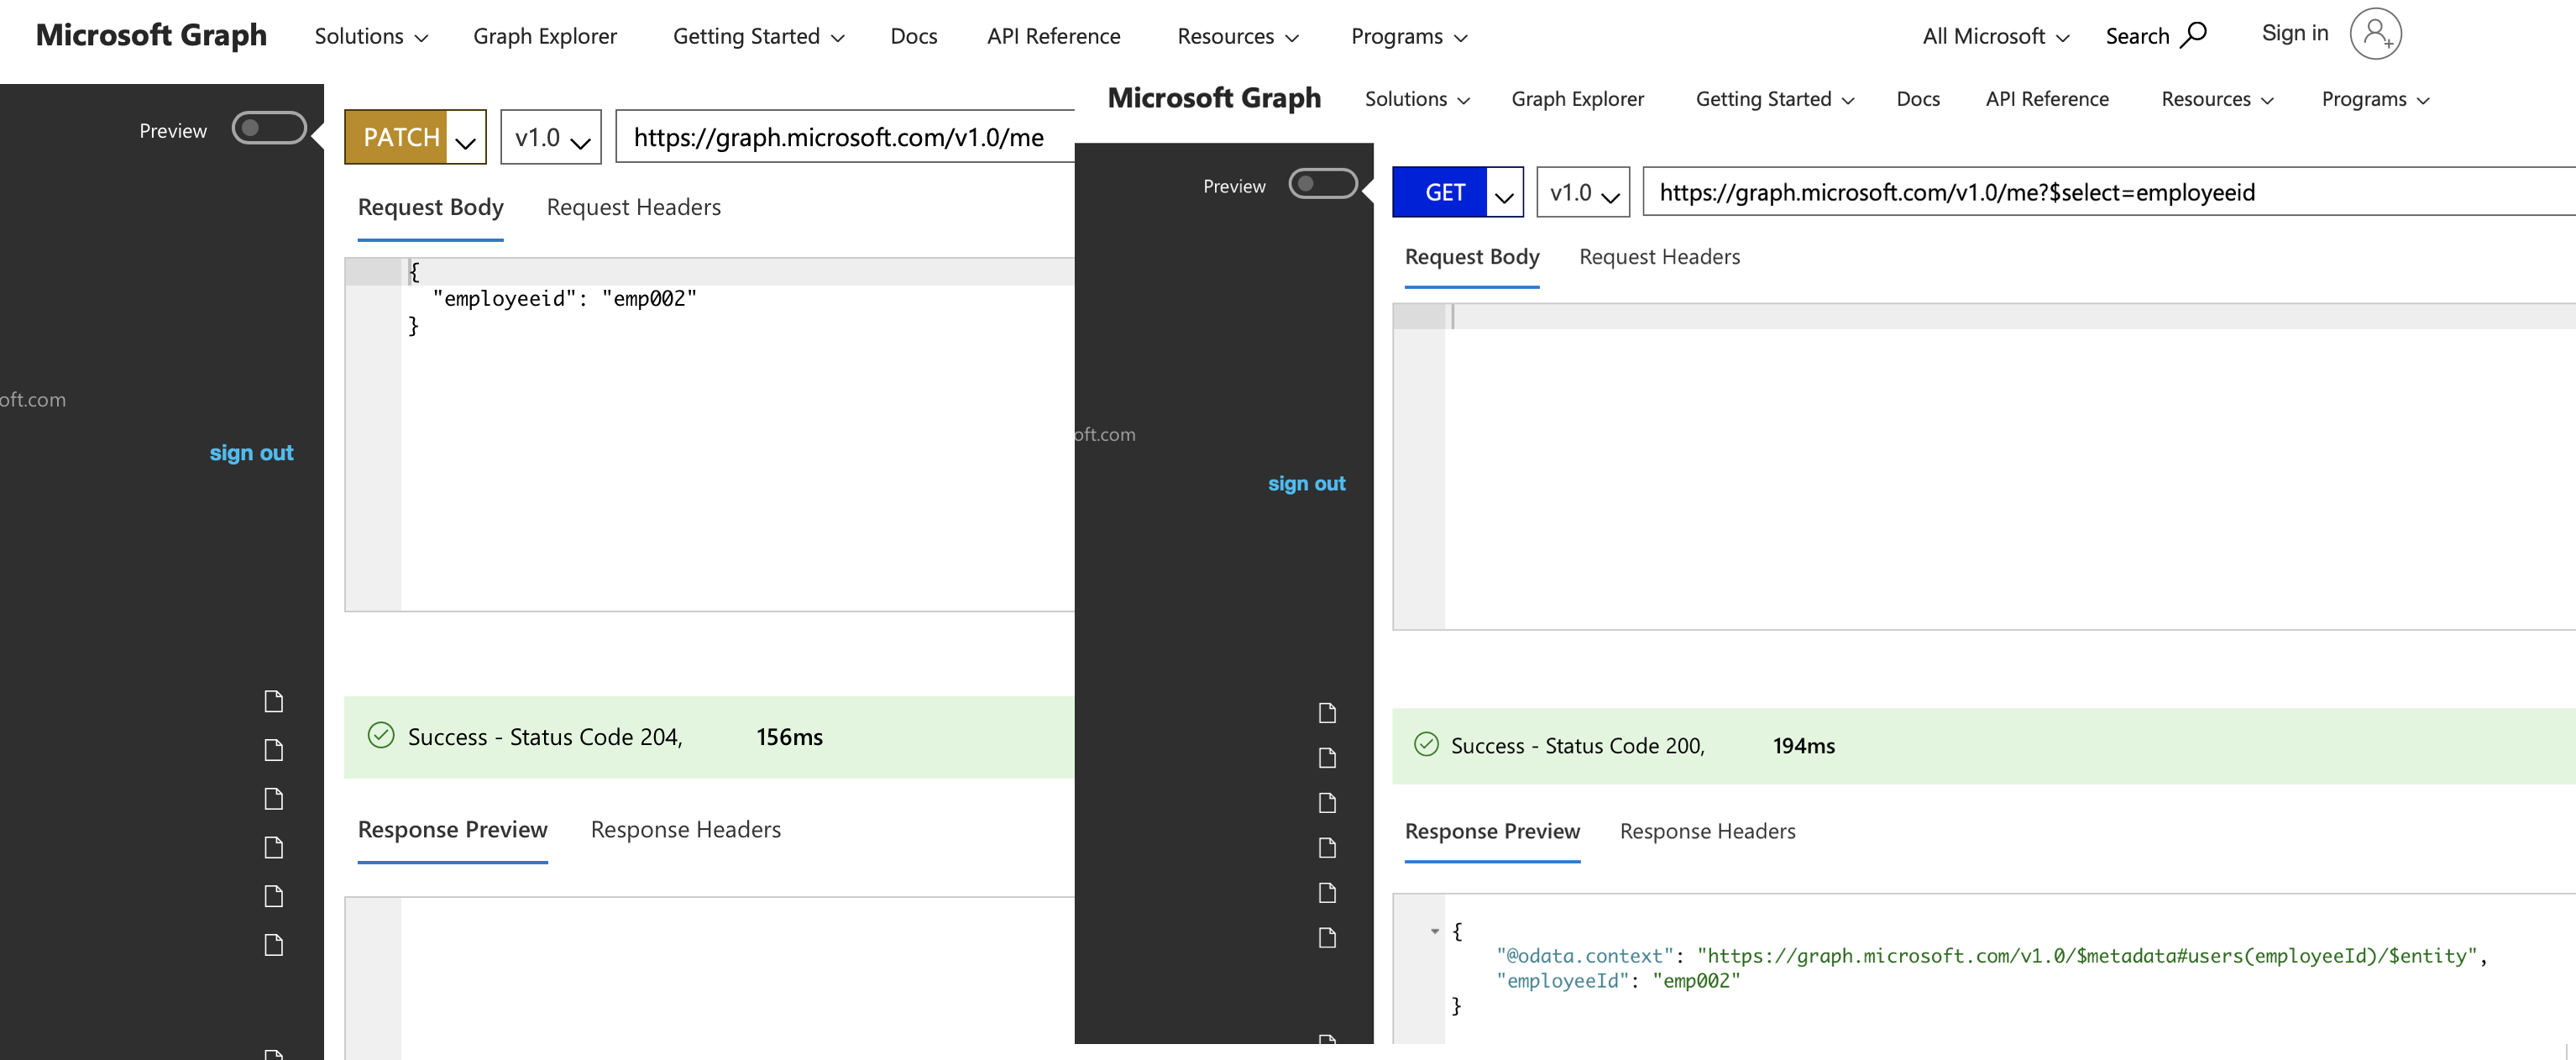
Figure 1 Graph Explorer
Register Application in Azure AD:
The Web Application (‘careerapp’, in this example)that needs to be protected with Azure AD User authentication should be registered first. The steps to perform are covered [here]
Ensure, the following are also done for the registered Application:
The Application ID & Secret are kept handy
https://www.getpostman.com/oauth2/callback is added to the list of redirect URLs in the registered application. This is for the Postman tool which I will use as the client application that accesses 'careerapp'
In the manifest of the registered application, set the attribute value > "acceptMappedClaims" to true
Provide the registered application with delegated access to the Graph APIs. After this, select the option 'grant Admin consent' on the Azure AD Tenant (assigned Graph API access to Sign users in, Read users' basic profile)
Note down the v1 Auth URL and Access Token URLs
Get the Service Principal Object ID:
The Object ID of the Service principal generated above, for the ‘careerapp’, is required.
Note that this is different from the Object ID of the Application registered above
The following Azure AD Powershell command returns the ObjectID of the Service Principal. The Azure AD Powershell Modules need to be installed first; see [here]
PS C:\Users\onepageradmin\Desktop> Get-AzureADServicePrincipal -SearchString "careerapp"

ObjectId                             AppId                                DisplayName
--------                             -----                                -----------
d6f8ca13-e9b6-459d-8481-d40933cd0d42 0ddd4a70-a813-4079-8ca8-e2fc5ced8f09 careerapp
Create and assign an Azure AD Claims Policy for the registered Application
I have followed the steps mentioned [here]
Claims policy creation
i) The JSON used in the claims Policy creation is shown below :-
{
    "Version": 1,
    "IncludeBasicClaimSet": "true",
    "ClaimsSchema": [
        {
            "Source": "user",
            "ID": "employeeid",
            "SamlClaimType": "http: //schemas.xmlsoap.org/ws/2005/05/identity/claims/employeeid",
            "JwtClaimType": "employeeid"
        },
        {
            "Source": "company",
            "ID": "tenantcountry",
            "SamlClaimType": "http://schemas.xmlsoap.org/ws/2005/05/identity/claims/country",
            "JwtClaimType": "country"
        }
    ]
}
ii)Create the Claims Policy:
#Install-Module -Name Az -AllowClobber -Scope CurrentUser

Connect-AzureAD -Confirm
# Object ID of service Principal is d6f8ca13-e9b6-459d-8481-d40933cd0d42
# App ID is 0ddd4a70-a813-4079-8ca8-e2fc5ced8f09
New-AzureADPolicy -Definition @('{"ClaimsMappingPolicy":{"Version":1,"IncludeBasicClaimSet":"true", "ClaimsSchema": [{"Source":"user","ID":"employeeid","SamlClaimType":"http://schemas.xmlsoap.org/ws/2005/05/identity/claims/employeeid","JwtClaimType":"employeeid"},{"Source":"company","ID":"tenantcountry","SamlClaimType":"http://schemas.xmlsoap.org/ws/2005/05/identity/claims/country","JwtClaimType":"country"}]}}') -DisplayName "Employment Details Claim" -Type "ClaimsMappingPolicy"
iii) Assign the Claims Policy to the registered Application
This Claims Policy includes the 2 additional attributes that are to be added to the JWT Token, and this policy gets assigned to the application registered. (i.e. only when a user signs into this application will the additional attributes be returned, not for other applications)
# Get the Object ID of the Claims Policy Object created in the previous step and use it in the next step below:
Add-AzureADServicePrincipalPolicy -Id "d6f8ca13-e9b6-459d-8481-d40933cd0d42" -RefObjectId "eed258ae-da60-4d29-bf21-1b38479b9de9"
Use Postman client to view the claim
Launch the option ‘Get new Access token’ in Postman, and enter the configuration values obtained from the previous steps in this post. See Figure 2 below:
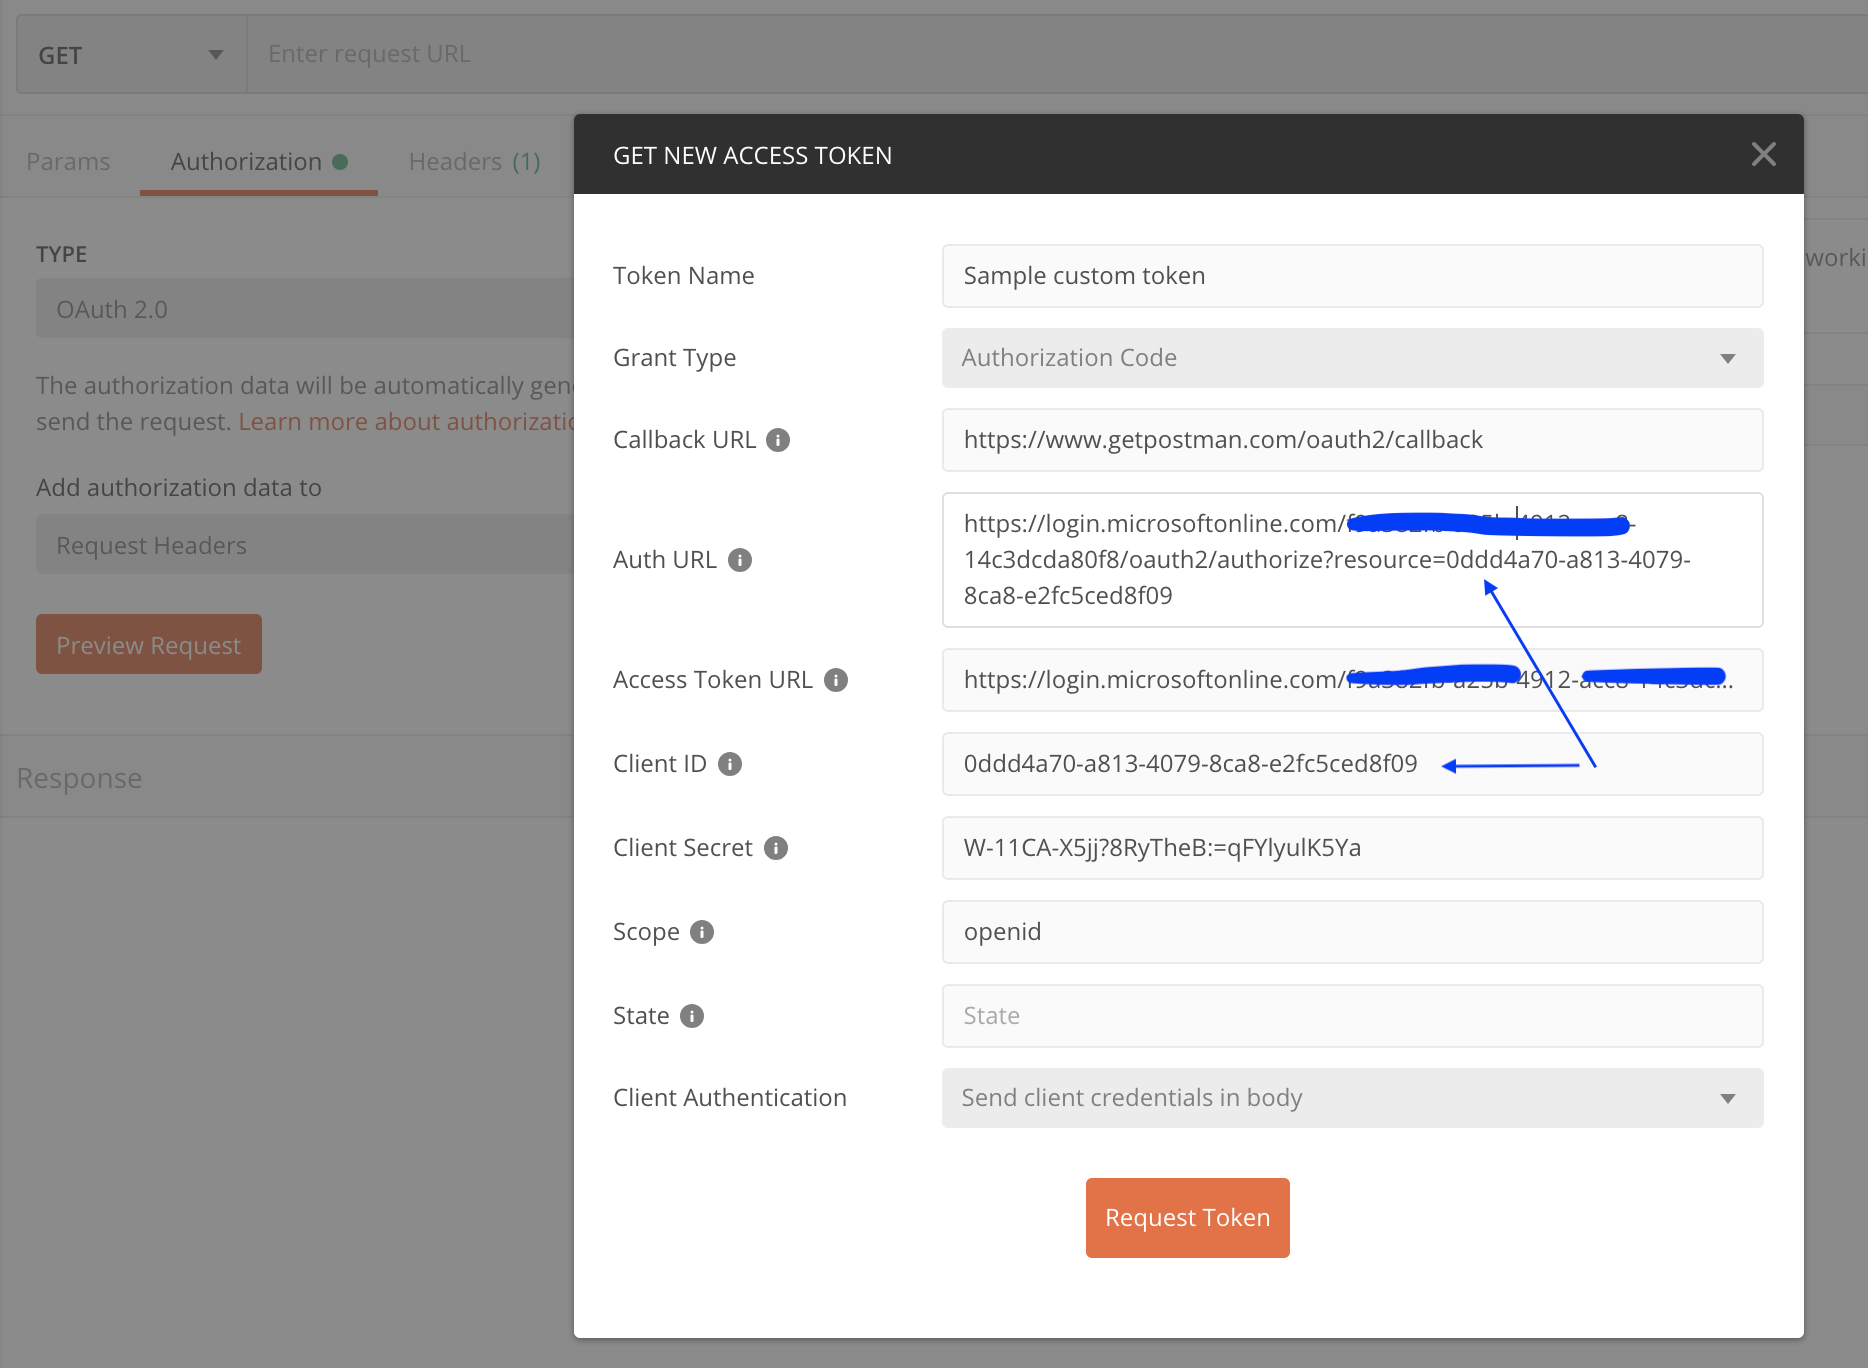
Figure 2: Use Postman Client
Checking the token generated shows the additional attributes that were added to the claims policy. see Figure 3 below:
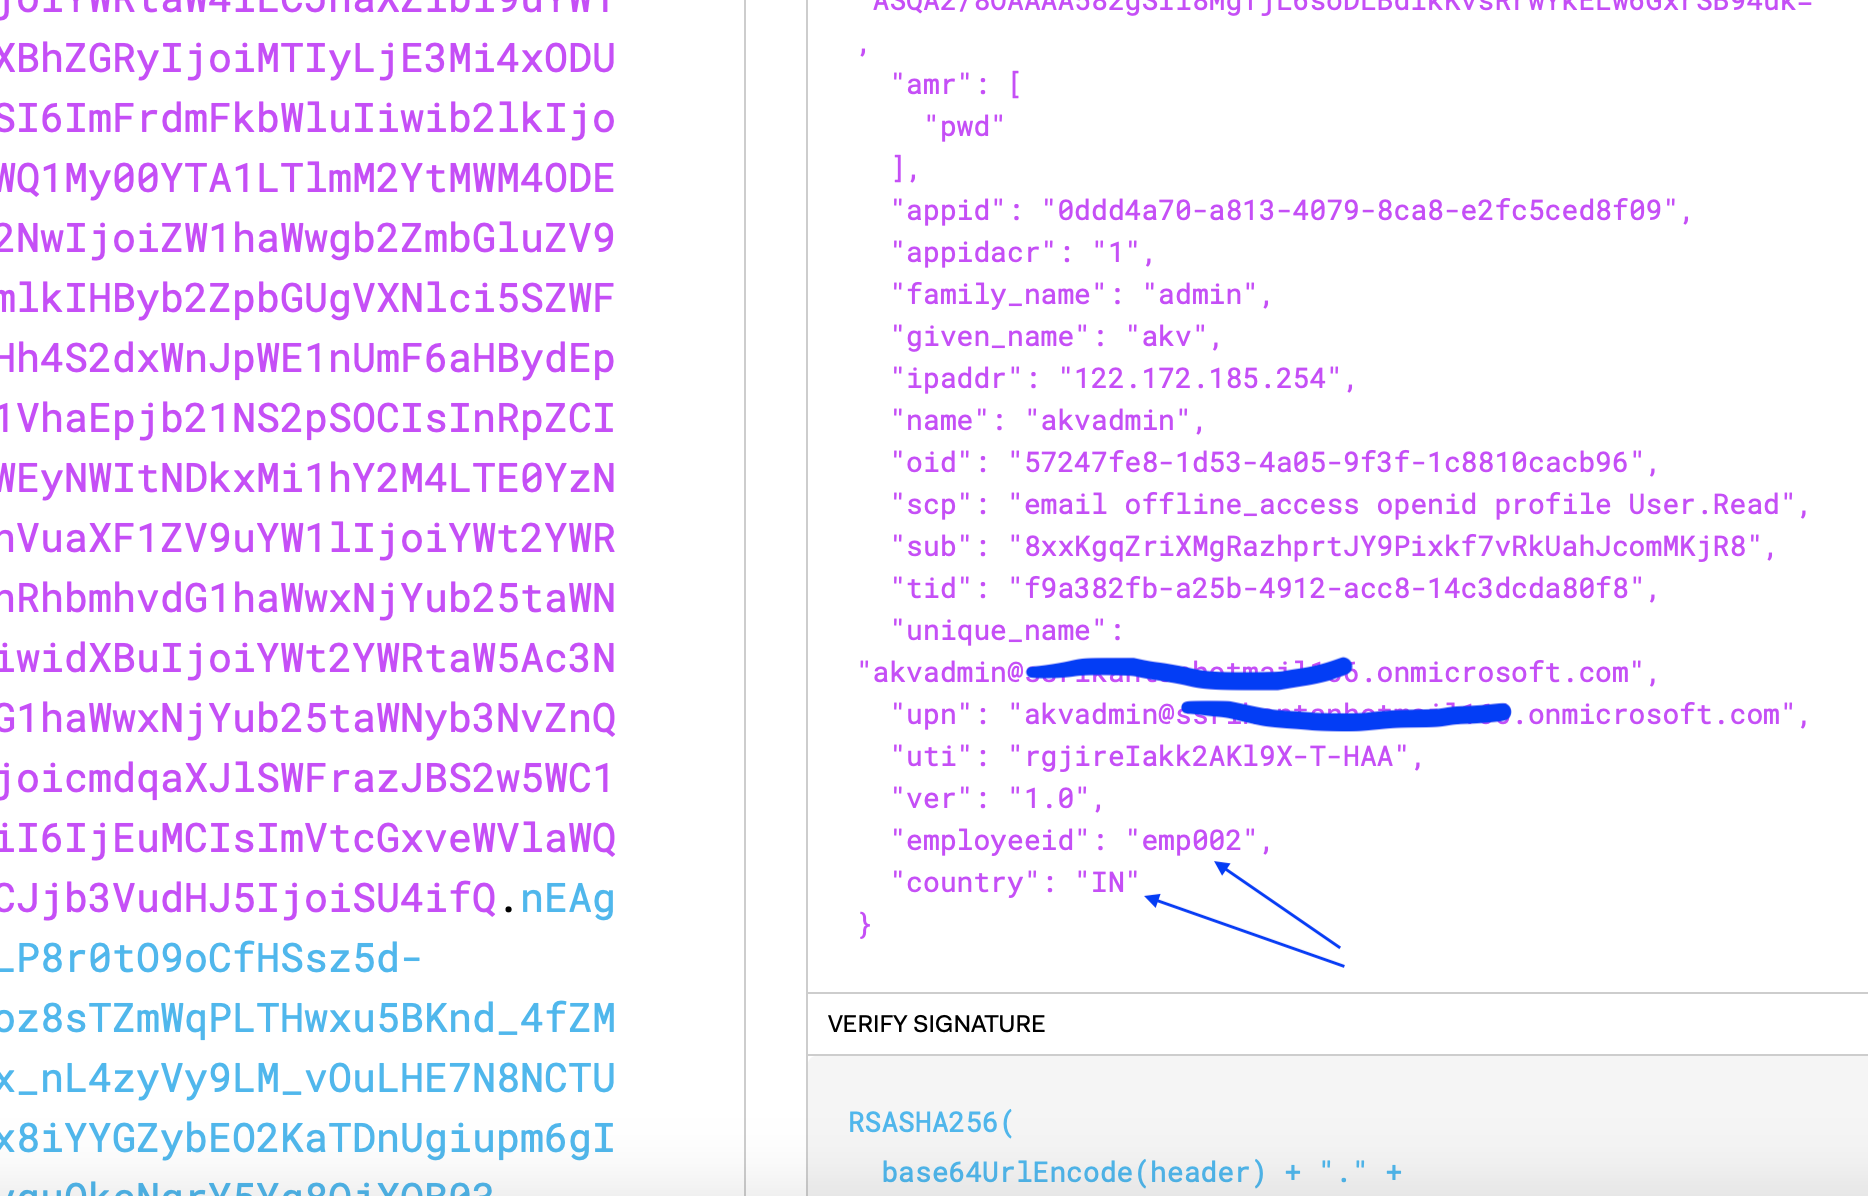
Figure 3: Jwt Token with additional attributes